Unit 12: Imaging software
Link to presentation https://prezi.com/p/utpjys5b4p_y/
Introduction
Unit 12, imaging software was more practical based; and allowed me to demonstrate a more creative presentation of work.
Each question focused on how imaging software is used by industry, professional and individuals to create and manipulate imagery, this being for both profitable, creative or practical results.
The unit explored many other aspects joined to the process including evaluating, planning, preparing and utilising tools within imaging software; thus allowing me to follow the creative process of practical and credible approaches used by market standard.
Also; demonstrating these methods correlated with identifying obstacles and technical factors that can be encountered and how these can be prevented or rectified.
Utilising both Photoshop and Illustrator for this presentation of work i was able to gauge a wider skill set on tools within both getting the most out of creating, editing and publishing. This also included techniques and elements such as colour processes, printing and digital publication.
I evaluate these areas in more detail within both the questions as well as the conclusion.
In terms of types of references, I used a combination of peer to peer posts and academic resources found online. However, a lot of the more professional standard information came at a cost. A dominant resource for education and learning is YouTube, which supplied many free step by step videos from other others and many industry professionals.
I am also confident within using Adobe software so also used the internet to cross check the methods i was using to assimilate if these were best practices.
Unit 12: Use imaging software tools to create, manipulate and edit images
2.1 Explain what technical factors affecting images need to be taken into account and how to do so
An image’s final result will reflect through the following factors:
- Image quality (from equipment used i.e. camera)
- Computer capacity (e.g graphic cards, screen resolution, storage)
- Image software used (i.e. free verses purchased)
- Image composition: Dimensions and pixels vs computer’s capacity.
The first three examples are unique to an individuals circumstances.
Ensuring image composition doesn’t exceed the computers capacity can be done by altering the form (dimensions/pixel resolution) to harmonise/suit the computer’s ability; this is known as re-sizing or upscaling.
Increasing resolution in relation to image size.
In Photoshop you can change the resolution or image size by opening the Image size within the menu. This now presents the option to change the pixels per inch, height and size.
The more pixels the image has in relation to the size the better quality will be produced.
Within the image size option you are able to view the relationship between image size and resolution. From here you can change width, height, or resolution. Photoshop allows for automatic re-sampling and so if you change one one value, the other two values change accordingly.
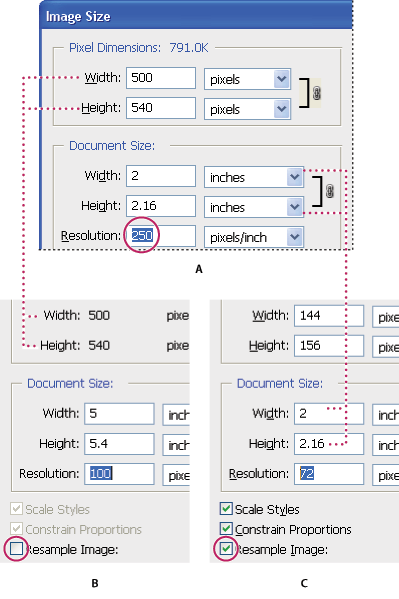
The result being a better quality image if the pixels have been increased and the image size decreased.

Other factors to consider
The best way to determine the optimum resolution is to think about the final use of your images. For publication you’ll need the highest resolution, for desktop printing lower, and for web use, lower still.
Other factors such as the popular file formats JPEG, TIFF, EPS and GIF offer different levels of pixel density.
Colours and unwanted objects
Final images can produce an unwanted expected finish e.g. blurs, obstacles or muted colours – Imaging software allows these to be altered using methods such as colour balance, masks, eclipse and patch tools.
Below is an example of a blur being transformed using the eclipse tool, to copy a segment of one part of the image and cover the blemish.

References
https://researchguides.case.edu/editimage/basicmanip#s-lg-box-7615200
https://www.eizo.be/knowledge/monitor-expertise/understanding-pixel-density/
https://helpx.adobe.com/uk/photoshop/using/image-size-resolution.html
2.2 Select and use suitable tools and techniques efficiently to create images
Below is an example of tools and techniques used within software Photoshop to create an image – the image is a photograph uploaded into a new document.
The photograph has been taken from a mobile phone and imported into Photoshop to render the image.
Photoshop tools and techniques to produce this below result are as followed:

- Transform tool: To resize the image and rotate slightly to ensure it is straightened and even
- Ruler tool: To provide vertical guideline in which to rotate and straighten image
- Marquee tool: To select portion of the image in which to target and trim to
- Exposure: To adjust lighting of the image to direct focus on the centre
- JPEG options: To save the image to the highest quality final state
2.3 Use guide lines and dimensioning tools appropriately to enhance precision
Suitable guide lines and dimensioning tools for manipulation software include:
- Ruler, guides and grid systems
- Measure or ruler tool
- Perspective grid
- Path/ pen tools
- Lasso / magic wand
- Masks
These separately have the ability to either measure, crop, compose, isolate or de-attach elements of the image, photo or illustration inside the document.
Below are examples of how each of these can be used to effect.
Creating guide lines:
Below i have used the ruler tool to create a grid system, this allows the user to have a guideline in which they can accurately separate or align elements of the photo and; manipulate parts so the composition has for example a focal point to reach the desired effect to the audience.
My grid system has been composed so the focal point is in the centre and directs attention to the final shining light of the days sun.

Next using the the path tool to isolate a certain parts of the image – this is useful at separating certain aspects and creating a guide line in which to separate into a new layer to edit further.

Next i have used the path tool to isolate a certain part of the image – this is useful at separating certain aspects and creating a guide line in which to separate into a new layer to edit further.
This can also be done using magic wand, selection and lasso tool, however an implication of these are that they produce a less accurate effect.
Creating dimensions
Dimensions are used to measure parts of an image or illustration in order to create symmetry, alignment, balance, composition and scale.
In contemporary times, they are particularly used in industries such as architecture and design in which digitally designed mock ups are rendered and produced to scale in order to create and real life demonstration of the final construction.
Adobe Illustrator and Photoshop have specific tools in which to do this including the measure and ruler tool.
Below is an example of the measure tool which creates a ruler outline and provides information on the dimensions on screen. The ruler tool having a similar behaviour.

References
https://helpx.adobe.com/uk/photoshop/using/grid-guides.html
2.4 Select and use appropriate tools and techniques to manipulate and edit images
Photoshop and Illustrator are effective tools to manipulate and edit images. Photoshop especially being dedicated to re-appropriating images through their selection of effects and tools.
Both Photoshop and Illustrator are used in industries such as Photography, Graphic Design and Media/Publishing.
Tools used for manipulation include
- Effect manipulation – Blur, Sharpen, Smudge, Dodge, Burn and Sponge.
- Colour manipulation – Levels, Saturation, Contrast, Filter, Tones andPaintbrush.
- Image manipulation – Warp, Mesh, Bloat, Puppet, Transform
(Image below used for example of manipulation)

Effect manipulation
Example using blur, sharpen and smudge tool

Colour manipulation
Example using Saturation, Hue and Colour Balance

Image manipulation
Example using Bloat & Transform tool

Another example using paintbrush:


References
http://akvis.com/en/photoshop-tips/editing-tools.php
2.5 Check images meet needs, using IT tools and making corrections as necessary
Composing and illustrating needs and requirements prior to practical work will reduce errors and diversion. This is especially important and should be practised as standard when using imaging software for industry briefs and projects.
These guide lines do not have to be technical, and can simply be performed through pen and paper in terms of needs e.g:
- Scale and proportion
- Document sizing
- Colour mode
There are also times in which an image can have unforeseen errors which can be amended for example:
- Poor lighting
- Unwanted obstacles or objects
Below are some examples using Photoshop and Illustrator on checking needs and using tools to correct errors.
Below is the finished image: examples below are errors retrospective to this result.
Scale and proportion

The proportion of the image is misaligned and contorted, using the tool Transform in Photoshop allows the scale and proportion to be reformat to the required size

Document Sizing
Document sizing can be reduced or increased to suit needs and requirements. Document sizing usually encompass considerations of:
- Print size
- Web size
- Image scale
Document sizing is a prerequisite when starting a new project these can be customised or selected through a template such as A4.
If these need to be altered later, this can be done using tools such as canvas size or document set up in Photoshop and Illustrator respectively.
Below are examples of changing the canvas size

Colour mode
Colour mode, or image mode, determines how colours are combined in the document, which reflects in the final product either on screen or via print methods. The most commonly used colour modes include Grayscale, RGB, and CMYK. Some imaging software also supports modes such as Bitmap, Dual Tone and Indexed.
In imaging software the Colour mode is specified upon creating the document, however these can be changed in tools Image mode (Photoshop) or upon saving the document in Illustrator. CMYK is used for print, RGB is used for web or screen
Further descriptions of colours modes are shown below:
- RGB (Additive colour mode) – Made up from colours Red, Blue and Green. An additive mode means that these colour lightness are added and combined to produce others. RGB provides the best colour quality for digital use as they provide the most ‘web-safe’ variants.

- CMYK – (Subtractive colour mode) – Made up of Cyan, Magenta, Yellow and Black A subtractive colour mode means colour lightness is reduced to produce different colours over adding. In CMYK each colour is assigned a saturation level and tiny dots are printed in patterns. This is what enables the human eye to perceive the specific colour made from the combination.

- Grayscale – Grayscale is formulated from it’s single pixel value. Each pixel value specifies how bright and what colour the pixel will be. Grayscale only carries one lightness, either black-and-white and so are composed exclusively of shades of Gray. Grayscale images are also called monochromatic, indicating the presence of only one (mono) colour.

Poor lighting
Poor lighting can be controlled using lighting tools and techniques, these include Lightness/Brightness, Levels, Colour Balance and photo filters.

Unwanted obstacles or objects
Imaging software have a variety of tools to remove unwanted objects from images. These include:
- Spot & healing tool
- Masks
- Patch tool
- Paint brushes
Below is an example of using the patch tool to remove smudges that have been superimposed onto an image

References
https://helpx.adobe.com/uk/photoshop/key-concepts/color-mode-image-mode.html
https://homepages.inf.ed.ac.uk/rbf/HIPR2/value.htm
2.6 Identify and respond appropriately to quality problems to ensure that images are fit for purpose and meet needs
Image quality problems form when there’s a clash of power capabilities within either the computer or camera (if using photography) for example, using a computer with a powerful graphics card will only reflect if importing a photo of high quality and vice versa.
Image quality is an important factor when looking at industry requirements and the audience, these can include human needs such as accessibility i.e: sight, colour blindness, desirability and effectiveness of communicating messaging.
An example of a common quality problem is Pixel Density.
Pixel density errors
A ‘pixel’ (short for ‘picture element’) is a tiny square of colour made up from Red, Blue or Green these combined together form the final image. The higher the amount of pixels the better quality the image will be.
Pixel density is an important factor when using imaging software – essentially structuring the quality of the image. Pixel density should be used in correlation with the image size relatively – e.g. the larger the image size the more pixels it requires to produce a better quality standard.
The pixel density per inch of the image below is <10 – comparing this to the image size (43 x 29 in) this produces the below result of an unbalanced and opaque finish.
I have adjusted this in Photoshop under the tool image size and increase the PPI to 72.


Final result

References
https://www.bbc.com/bitesize/articles/z2tgr82
https://blog.prototypr.io/making-sense-of-device-resolution-pixel-density-40922aeb8a6
Conclusion
Unit 12 imaging software opened up the use of suites for a more targeted approach to imagery i.e. considering factors such as audience needs, messaging, industry standards and technical barriers.
The design industry relies heavily on the use of digital software packages and so a lot of the information found included a multitude of considerations when looking at user needs and functional requirements; based on how the image will be viewed – i.e. desktop, mobile, screen size, readability and accessibility.
The more technical requirements needed more extensive research from external references and included factors such as image format, image colour format and pixel density. These requirements now seems more automated in the higher end imaging softwares tools, as both Photoshop and Illustrator have the ability to automatically re-appropriate images to fit conventions. This also includes mathematical features such as grids and guidelines.
Unit 12 provides a more creative approach and practical manner in which to extend my knowledge and skill set on software, whilst also providing me with the understanding of how and why settings are needed and used for different purposes and audiences.
It has also brought up more moral considerations in which imaging software can be and is used by industry to manipulate reality for use of entertainment, consumerism and popularity. Ultimately appearances can change and perception can be altered through the use of effective editing, this can be also be used for positive alternations i.e. unwanted marks, obstacles and colour, however it increases our expectations on perfection or idea of perfection on real life. An image can reveal so little but tell us or lets us decide so much.
